
Jupyter 많이 쓰시죠.
이번 포스팅에선 Jupyter에서 ipywidgets 를 이용하여 썸네일과 같은 Image Viewer를 만들어보겠습니다.
먼저 전체적인 코드를 먼저 보여드리면…
import os, glob, json
import ipywidgets as widgets
from ipywidgets import Button, AppLayout, Layout
%matplotlib inline
# list 내의 값을 무한 반복 시키기 위한 cycle_list 클래스
class cycle_list():
def __init__(self, values):
self.values = values
self.max_idx = len(values)-1
self.curr_idx = 0
def next(self):
if self.curr_idx == self.max_idx:
self.curr_idx = 0
else:
self.curr_idx += 1
return self.values[self.curr_idx]
def prev(self):
if self.curr_idx == 0:
self.curr_idx = self.max_idx
else:
self.curr_idx -= 1
return self.values[self.curr_idx]
# Image_Viewer 앱
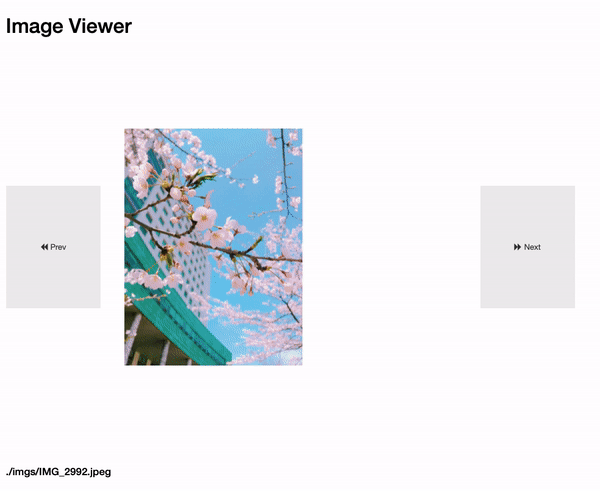
def Image_Viewer(root_path):
# Header 내용
header = widgets.HTML("<h1>Image Viewer</h1>", layout=Layout(height="auto"))
# Next, Prev 버튼
prev_button = widgets.Button(
description="Prev", icon="backward", layout=Layout(width="80%", height="30%")
)
next_button = widgets.Button(
description="Next", icon="forward", layout=Layout(width="80%", height="30%")
)
# 이미지 읽기
img_file_list = glob.glob(os.path.join(root_path, '*.jpeg'))
images = cycle_list(img_file_list)
image = widgets.Image(
value=open(img_file_list[0], "rb").read(),
format="jpeg",
width="50%",
height="50%",
)
# Footer 내용.
footer = widgets.HTML(f"<h4>{img_file_list[0]}</h4>", layout=Layout(height="auto"))
# Button Action을 위한 함수 구성.
def update_image(filename: str):
with open(filename, "rb") as f:
image.value = f.read()
def update_footer(filename: str):
footer.value = f"<h4>{filename}</h4>"
def update_widgets(filename: str):
update_image(filename)
update_footer(filename)
def handle_next(button):
update_widgets(images.next())
def handle_prev(button):
update_widgets(images.prev())
prev_button.on_click(handle_prev)
next_button.on_click(handle_next)
app = AppLayout(
header=header,
left_sidebar=prev_button,
center=image,
right_sidebar=next_button,
footer=footer,
justify_content="center",
align_items="center",
pane_heights = (50, 500, 50),
pane_widths = (100, 300, 100)
)
return app
root_path = './imgs'
Image_Viewer(root_path)
이 방법은 ipywdgets의 AppLayout 을 사용하는 건데요.
AppLayout은 기본적으로 다음과 같은 구성이 고정입니다.
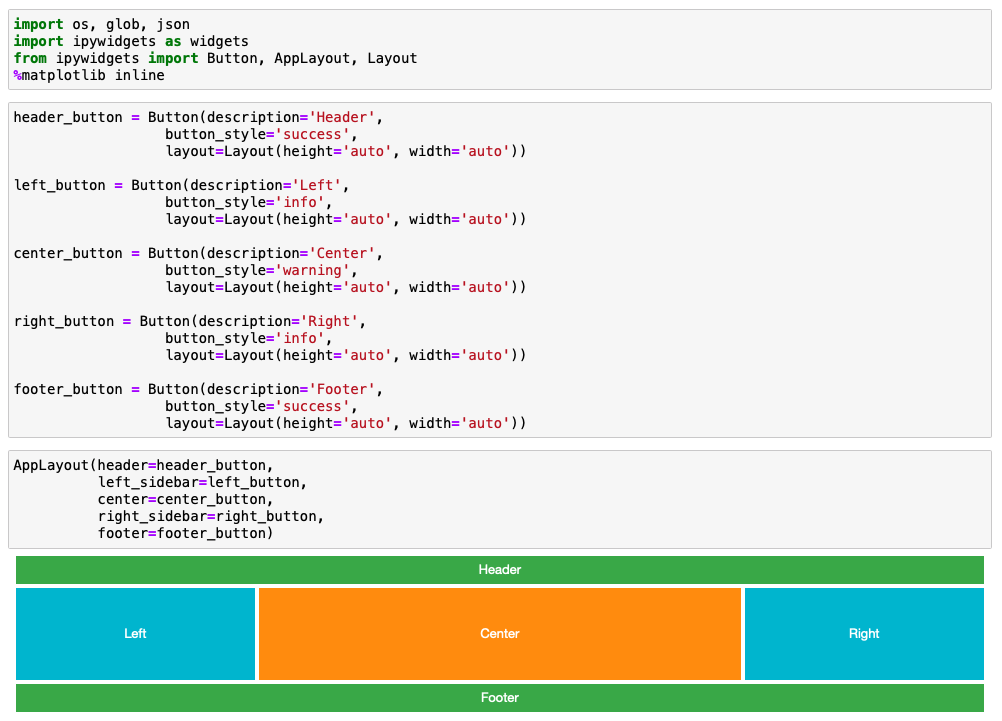
이 구성에 각각의 파트를 넣은 것 뿐….
데이터 검수를 위해서 GUI를 만들어야할 일이 있었는데 흠…
이걸로 한번 만들어볼까 합니다.
상세설명은 안할거에요!
그럼 이만…